Additional Information About Fitting RCB Shroud Tracks and Cars to an Existing Tasar
Note: Interpretation 37, which governs the retrofitting of RCB tracks and slides, was amended on August 17, 2008, to clarify the measurements that define the allowable movement of the slides. The information on this page was edited on February 8, 2009, to clarify the references to these measurements.
ISAF has recently approved a request by the designer allowing 19mm RCB shroud tracks and cars to be fitted to new Tasars. An Interpretation by the Chief Measurer will enable owners of existing Tasars to fit this same equipment to their boats. Note that use of 14mm RCB track is not permitted.
Following are notes and a guide on how to retro-fit the 19mm RCB system to an existing Tasar.
Mandy Stock, the UK Tasar Builder, has suggested that by using slightly shorter tracks - 235mm instead of 248mm, it may be possible to use the same end cap holes as the old C track. With this method though there is about 5mm less car travel. Two additional holes will need to be drilled in the RCB track to accommodate the end caps, these will then match the C track holes in the gunwhale.
Parts needed:
2 x Ronstan RC11902 Cars 4 x Ronstan RC11980 Track Ends 2 x 235mm lengths of Ronstan RC1190-1.0 track 2 x Clamcleat CL 268AN Cleats 4 x Ronstan RF 1850S Shackles (2 required, 2 optional) 8 x 2" x ¼" machine bolts (screw head) Approx 1 metre of 4mm laid (preferable) or braided line (to be trimmed to length) 2 x 400mm lengths of 18mm alloy or stainless steel rod or stainless steel bar to provide rigid under gunwhale support. These should extend 75mm past both ends of each track.
Note:
1. Buying a 2 metre length of Ronstan track, RC1190 is the most economical purchase. It enables 3 boats to be fitted out. 2. Use of stainless steel rod for the under gunwhale support is preferred. Whilst a little heavier than alloy it avoids any possibility of electrolytic reaction between dissimilar metals. 3. The Clamcleat CL 268AN (anodised, hardened) is preferred. The RCB Trial showed the material used in the Clamcleat CL268 (non anodised, hardened) to be too soft and liable to be worn away by the friction of the pull back line. 4. Exercise care when handling the RC11902 Cars, lest the ball bearings escape.
Owners are reminded of the measurements which apply to RCB tracks, namely:-
1. The track shall be fitted with bolts to the backing plate that shall fit into the gunwhale groove. 2. The distance from the bow U bolt, measured as shown at deck level, to the forward track end bolt hole shall be a minimum of 2125mm and a maximum of 2135mm. Car travel must not exceed 140mm. (see Interpretation 37)
It is recommended that RCB track is fitted using the existing forward bolt hole from the old C tracks.
Fitting the RCB tracks
Drill and tap the 18mm under gunwhale support rod to receive the ¼" machine bolts. Alternatively, drill right through the rod and use nyloc nuts to join the track to the support rod through the gunwhale, longer bolts will be required.
Remove the existing C section stainless steel tracks and clean up the upper and lower bearing surfaces of the gunwhale. Careful use of a small angle grinder may help in removing frozen nuts and bolts.
Assemble the RCB car and track ends onto the track and place them on the gunwhale in their approximate final position. Measure 2140mm from the bow U bolt fitting at deck level (see photo 1) back to the bearing point of the car shackle, when the car is in its most forward position, ie, up against the forward track end.
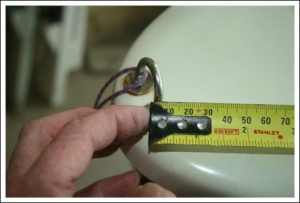
Photo 1 - Measurements are taken from the bow U bolt at deck level
Through the holes in the new track, mark the location of the three locating holes to be drilled in the gunwhale. It may be possible to use at least one of the existing holes from the old C track.
Any unused holes remaining from the C tracks will need to be filled and sealed.
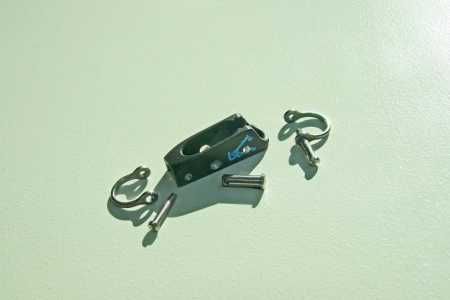
Location of the RCB tracks athwartships is indicated by the holes that were used to secure the C tracks and the need to properly locate and engage the under gunwhale support rod. The final location of the RCB's should see a little bit of overhang beyond the gunwhale - see photo 2.

Photo 2 - The RCB's will overhang the gunwhale a little bit
Care should be taken when drilling the new holes in the gunwhale. It is important for the securing bolts to pass through the gunwhale at the correct angle so they can easily pick up the under gunwhale support rod. The use of a pilot hole in the first instance is suggested.
Liberal application of an appropriate sealant to all holes and fittings is recommended.
With the new tracks in place, check to make sure the correct measurements apply (Note: this wording was amended 2009-02-08).
Clamcleat Modifications
The Clamcleats (CL 268AN) will need to be drilled to accept the Ronstan RF 1850S shackles. A 1/8" hole should be drilled through the cleat 5mm in from the leading edge and 5mm in from the base. An additional option is to drill another 1/8" hole 15mm in from the back edge of the cleat and 5mm in from the base to take another shackle, which acts as a guide for the pull back line.
A 5mm hole drilled 3mm from the base and 17mm from the front of the cleat will allow a 15mm clevis pin to be inserted just in front of the teeth of the cleat, which will act as a bearing for the draw back line.
Finally, the forward screw hole in the base of the cleat should be milled or filed out back towards the teeth of the cleat and rounded off in order to accept the 4mm pull back line - see photo's 3 and 3a.
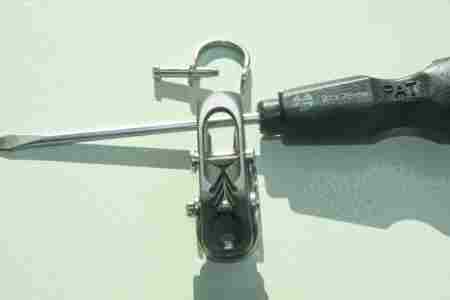
Photo's 3 and 3a - Detail showing modifications to the Clamcleat
Rigging the RCB's
See photo 4. The Clamcleat is shackled to the traveller car. A hole is drilled in the back of the aft track end cap to accept the knotted end of the 4mm pull back line. This line is led directly from the track end cap through the guide shackle to the Clamcleat then attached to the pull back handle.
Remember that Class Rule 2.2k still applies, that is ......with the slide fully forward and the line fully extended aft, the distance from the aft end of the track to the bearing point of the pull back handle shall not exceed 150 mm.
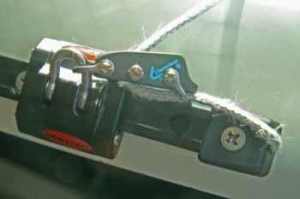 |
The shackle at the right hand end of the cleat (as pictured) simply acts a guide for the pull back line, and is optional. |
Photo 4 - Detail of the RCB traveller car showing how it is rigged